Many factors can affect the performance and outcome of a backup task. One of the things that we have found particularly helpful for identifying performance problems, for example, is to have disk activity statistics available during a backup. CCC's Disk Center provides this kind of statistics monitoring, as well as general volume information for each locally-attached volume mounted on your Mac. Choose "Disk Center" from CCC's Window menu to view the Disk Center.

Basic volume information
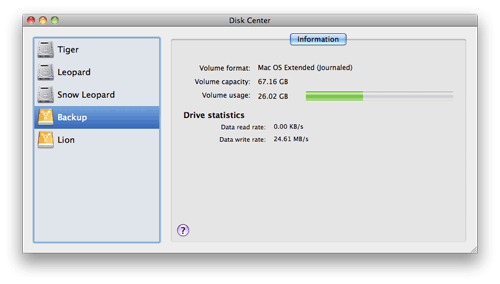
The Disk Center window displays a list of locally-attached, mounted volumes in a table on the left. Click on one of these volumes to display information such as the volume name, filesystem, capacity, and disk usage. CCC displays a level indicator next to the disk usage figure. When disk usage exceeds 70% of the volume capacity, the level indicator will turn yellow to indicate that you may want to consider "cleaning house". If the disk usage exceeds 90% of the volume capacity, the level indicator will turn red. Especially on a volume that contains an installation of OS X, we recommend that you try to maintain at least 10% of the volume as free space. When you start to consume that last 10%, fragmentation becomes a problem and general performance of OS X begins to decline.
Drive Statistics
The Disk Center will update disk activity statistics on a one-second interval. Disk activity is collected by OS X at the hardware interface, so data for multiple volumes residing on the same disk will be identical. The data read and write rate can give you a good indication of how fast OS X is able to read and write data from and to your disk. You will likely notice that these values fluctuate wildly over the course of a backup task. This is quite normal, write performance will generally be lower when copying lots of small files and higher while copying a larger file. When lots of small files are being copied, there is a lot of seek activity occurring on your source and destination volumes. This seeking greatly reduces the overall throughput compared to the theoretical throughput of your disks.
If your backup task seems particularly slow, stop the task and see what the baseline disk activity is. For example, while running a performance test, I couldn't understand the absolutely dismal performance I was seeing. In the middle of the task I had launched Safari so I could download and test Growl on my test system, and I didn't think it would have a measurable affect on the task. I stopped the task and noticed a persistent 1.8MB/s level of write activity on my source volume in the Disk Center. After a brief investigation, I discovered that Safari was writing massive cache files to my home directory. After quitting Safari, my backup performance was back to normal.
Disk error statistics
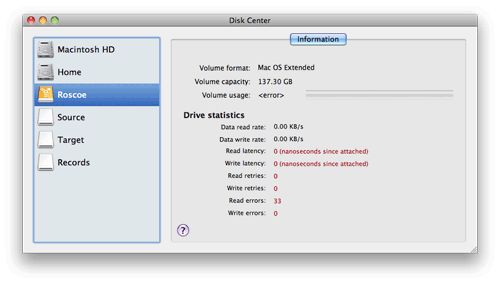
CCC will report error-related statistics when they are present. You can tell at a glance that something is wrong with this disk:

Read and write latency is a cumulative measurement of the amount of time that the disk interface had to wait for a read or write operation to return data (in cases where the operation ultimately succeeded). Read and write retries indicates the number of times that the disk interface had to make multiple attempts to retrieve data (again, this value only pertains to attempts that were ultimately successful). Read and write errors indicate the number of read or write attempts that were simply unsuccessful. The meaning of each of these values is less important than their meaning as a whole. If you're seeing any red data in the Disk Center, there's a good chance that your hard drive is suffering a hardware problem.
Full Disk Encryption, aka FileVault 2 (Lion or greater)
Apple introduced a new "Full Disk Encryption" feature to OS X Lion, and CCC offers some advice around enabling encryption in the Disk Center.
Enabling encryption on a volume that contains (or will contain) an installation of OS X
If your goal is to create a bootable, encrypted backup, use the following procedure:
- Use CCC to back up your installation of OS X to the unencrypted destination volume.
- Use CCC's Disk Center to associate a Recovery HD with your backup volume
- Start up your Mac from the backup volume
- Enable FileVault encryption in the "Security & Privacy" preference pane of the System Preferences application
- Reboot your Mac from your primary startup disk
- Configure CCC for regular backups to your encrypted backup volume.
Enabling encryption on a volume that will not contain an installation of OS X
If your backup volume won't be a bootable backup of OS X, simply right-click on that volume in the Finder and choose the option to encrypt the volume.
Can I back up an encrypted volume to a non-encrypted volume?
Yes.
If I back up an encrypted volume to a non-encrypted volume, will the copied files be encrypted on the destination?
No, encryption occurs at a much lower level than copying files. When an application reads a file from the encrypted source volume, OS X decrypts the file on-the-fly, so the application only ever has access to the decrypted contents of the file. Whether your backed-up files are encrypted on the destination depends on whether encryption is enabled on the destination volume. If you want the contents of your backup volume to be encrypted, follow the procedure outlined above to enable encryption.
Can Carbon Copy Cloner enable encryption on my backup volume?
No. You can enable encryption in the Security & Privacy preference pane while booted from your bootable backup, or in the Finder by right-clicking on your backup volume.
What happens if I change my account password on the source volume? Does the encryption password on the backup volume get updated automatically?
The encryption password(s) on the backup volume will not be automatically updated when you change the password for an account on the source volume. To update the encryption password on the destination volume:
- Choose the backup volume as the startup disk in the Startup Disk preference pane and restart your computer. You will be required to provide the old password to unlock the volume on startup.
- Open the Users & Groups preference pane in the System preferences application.
- Click on the user whose password was reset on the source volume and reset that user's password again. Resetting the password while booted from the backup volume will update the encryption key for that user on the backup volume.
- Reset the password for any other user accounts whose password was reset on the original source.
Cloning Apple's Recovery HD partition
Starting with Mac OS X Lion, the OS X Installer creates a new, hidden volume on your startup disk named "Recovery HD". The primary purpose of the Recovery HD volume is to offer a method to reinstall OS X (Apple no longer distributes the OS X Installer on a DVD). When performing a backup of an OS X volume, Carbon Copy Cloner automatically archives the Recovery HD volume that is associated with the source volume to a disk image. This archive can later be restored to another Recovery HD volume. CCC's Disk Center also offers the ability to create a new Recovery HD volume on your destination disk.

Creating a new Recovery HD volume
Drobo devices do not support dynamic volume resizing (reference), and therefore cannot accept a Recovery HD volume. Do NOT attempt to create a Recovery HD volume on a Drobo device.
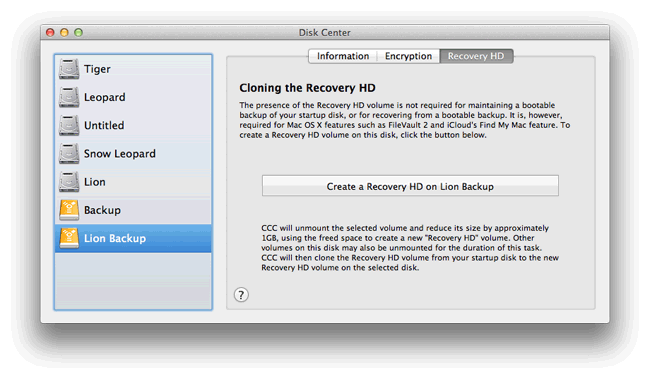
The Recovery HD volume is approximately 650MB, so to create a new Recovery HD volume, you must choose a volume on your disk that has at least 1GB of free space available. This documentation will refer to the chosen disk as the "donor" disk. No data will be harmed on the donor disk, it will simply be resized so some space can be allocated for the new Recovery HD volume. When you click the button to create a new Recovery HD volume, CCC will do the following:
- Unmount the donor disk
- Perform the equivalent of Disk Utility's "Verify disk" tool
- Resize the donor volume to (size of the donor volume) - 1GB
- Create a new volume named Recovery HD using the 1GB of borrowed space
- Clone a suitable Recovery HD volume from another disk (such as the startup disk) or an archive of the Recovery HD volume onto the newly-created Recovery HD volume
- Remount the donor volume
When the task has completed, the Recovery HD volume will not be mounted on your Desktop, nor will it appear in Disk Utility (it's a very special, very hidden volume!). You can verify the functionality of this Recovery HD volume by holding down the Option key on startup, then selecting the Recovery HD volume as the startup disk.
Re-cloning an existing Recovery HD volume
If you choose a volume on a disk that already has a Recovery HD volume, CCC will indicate that you may "Re-clone the Recovery HD volume on this disk". Recloning the Recovery HD volume may be helpful if the Recovery HD volume is invalid, or its partition type is invalid (and it appears on your Desktop).
When do I need to create a Recovery HD volume?
CCC bootable backups offer similar functionality to the Recovery HD volume, so the Recovery HD volume is not strictly required on a backup volume. Unless you have a specific reason to not create a Recovery HD, though (e.g. because it could affect a Boot Camp partition on the same disk, you don't want to give up the 1GB, etc), we recommend that you maintain a Recovery HD volume on your backup disk. Especially if you intend to use your destination volume in production (e.g. you are migrating to a larger disk, or restoring to a replacement disk), or if you intend to enable encryption on a volume on the backup disk, then you should create a Recovery HD volume on the destination disk. If you intend to enable encryption on the destination volume, we recommend that you create the Recovery HD volume before enabling encryption. A Recovery HD volume is not required for restoring an installation of OS X from a CCC bootable backup.
What is the difference between archiving the Recovery HD and creating a new Recovery HD?
During the course of an ordinary backup of a volume that contains OS X, CCC will automatically create an archive of the Recovery HD associated with that volume. This archive is stored on the source volume, and is subsequently backed up to the backup volume along with everything else. This archive of the Recovery HD volume can be used in the future to create a new Recovery HD. The archive is not, however, an operational Recovery HD volume, it's just a backup file.
CCC's Disk Center offers the ability to create an operational Recovery HD volume as well. This functionality is completely separate from creating an archive of the Recovery HD. Unlike the archiving of the source Recovery HD, creating a new Recovery HD is not something that happens automatically, you have to ask CCC to do this in the Disk Center. When CCC creates a new Recovery HD, it borrows space from your destination volume to create a new, hidden volume on that disk. The resulting Recovery HD is fully operational — you can boot your Mac from it and reinstall OS X. Refer to the previous section to determine if creating a Recovery HD is required in your situation.
Why were other volumes on my disk unmounted when I created a Recovery HD?
CCC uses a command-line version of Disk Utility to resize the donor volume. Resizing that volume requires making changes to the partition table on the disk, and Disk Utility may choose to unmount other volumes on the disk while it makes those changes. CCC will specifically remount the donor volume, but whether Disk Utility remounts the other volumes is a function (or bug) of Disk Utility. You can remount these volumes manually in Disk Utility.
Can I configure CCC to not automatically archive the Recovery HD onto my source volume?
Yes. Choose "Preferences" from the Carbon Copy Cloner menu and uncheck the box next to "Automatically create an archive of Apple's Recovery HD volume".
Can I create a Recovery HD on an Apple "Fusion" volume?
No, not with CCC. Creating a Recovery HD requires borrowing space from a physical volume, and that is not a modification that we recommend making to an underlying member of an Apple Core Storage logical volume. The only Apple-supported method of creating a Fusion volume is via Disk Utility or the OS X Installer, and each of those will create a Recovery HD volume before the Fusion volume is created. If you intend to create your own Fusion volume using one of the various tutorials available on the Internet, and if you want that volume to have an associated Recovery HD volume, we strongly recommend that you create a Recovery HD volume before creating the Fusion volume. You can use CCC to create the Recovery HD volume on the slowest disk that you intend to add to the Fusion logical volume group. See the following document for a demonstration.
Creating a Fusion volume with a Recovery HD (no longer available)