If you would like CCC to send your tasks' results via email, you must first configure a sending email account in CCC's Email Settings.
- Choose Preferences from the Carbon Copy Cloner menu (or click the Preferences button in the toolbar).
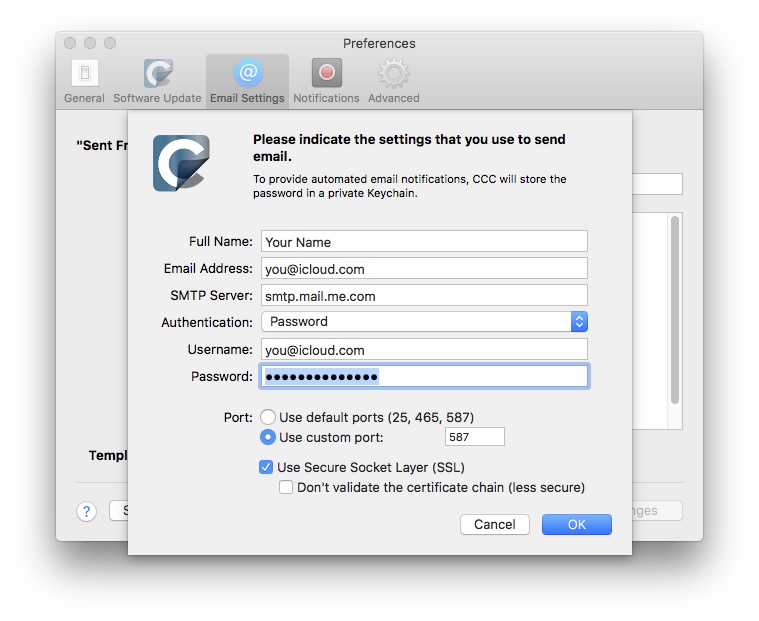
- Click the Email Settings button in the toolbar of the Preferences window.
- Choose from one of the accounts imported from Mail in the Sent From Email popup menu, then verify the details and provide your account credentials in the form that is provided.
- Click the OK button when you are finished entering your account details.
Note for advanced users: If your SMTP server requires SSL and uses a self-signed security certificate, check the Don't validate the certificate chain checkbox. Alternatively, you can add your server's security certificate to the System keychain in the Keychain Access application and explicitly trust that certificate.
[Optional] Modify the email subject and body template
The subject and body of the email that CCC sends upon task completion can be customized. For example, if you want to know which of your Mac's a particular email is coming from, you could customize the subject of the message:
Jon's iMac: ##Task Name##: ##Exit Status##
When CCC sends an email notification, it will replace the template values (enclosed in double # characters) with the attributes of your task, e.g.:
Jon's iMac: Daily Backup: Backup Finished Successfully
Most of the available template values are already present in the default template. You can rearrange the template values and modify the text around them, but do not modify the text inside of the double # characters. If you would like to add a template value:
- Place the cursor where you would like to place the template value, e.g. in the subject or body text field.
- Select a template value from the Template values popup menu.
- Click the Insert button.
When you are finished making changes to your subject and body templates, click on the Save Changes button. This template will be used for all email notifications sent by CCC.
If you have suggestions for additional template values, please let us know!
Send a test email
Click on the Send Test Email... button at the bottom of the window. You will be prompted to provide an email address to send the test email to. When CCC indicates that the test email has been sent, check your email to confirm that you can receive it and that the template provides the information you wish to receive when your tasks complete.
Select a notification level
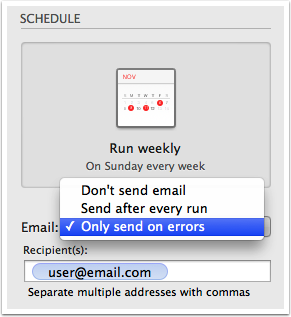
Close the Preferences window, then select the task to which you would like to add email notifications. There are three notification levels:
- Don't send email: CCC will never send an email when this tasks finishes.
- Send after every run: CCC will send an email at the end of every task (i.e. successful tasks and those that report errors).
- Only send on errors: CCC will send an email only when errors occur for this task.
Select a notification level, then specify the email addresses that you would like CCC to notify when the task completes. If you would like to have emails sent to multiple addresses, separate those addresses with a comma, or simply press the return key after typing in each address. The recipient text field may only show one address at a time. Use the arrow keys to see each address.
Once you have configured a notification level and recipients, choose Save from CCC's File menu to save the changes.
Sending email with an SMTP service that requires an App Password
Because CCC sends emails from a background application, possibly when no user is logged in at all, CCC cannot practically support two-factor authentication. Many applications have this same logistical constraint, and most email providers will allow those applications to use the SMTP service, provided that you have created an application-specific password for that purpose. If you attempted to send an email with your Gmail or iCloud account (for example), and you get an error that "the username and password are invalid", or that "authentication failed", you can resolve the problem by creating an App Password.
Solution: Create an App Password for iCloud
Visit your Apple ID account page and create an application-specific password for CCC:
- Sign in to your Apple ID account page.
- In the Security section, click the Generate Password... link under the APP-SPECIFIC PASSWORDS heading and follow the steps provided.
- Paste the application-specific password into the Email Settings panel of CCC's Preferences window.
- Note: Be sure to use an @mac.com, @me.com, or @icloud.com email address for the user name.
Apple's reference: Using app-specific passwords
Solution: Create an App Password for Yahoo
Visit your Account Security page to generate an application-specific password for CCC:
- Visit your Account Security page.
- Click on the Generate app password link at the bottom of the page.
- Click Select yourapp and choose Other App. Type in CCC or Carbon Copy Cloner as the custom name.
- Click the Generate button.
- Copy and paste the application-specific password into the Email Settings panel of CCC's Preferences window. Note: We recommend that you copy and paste the code. If you choose to transcribe it, take care not to insert spaces. The code is presented in four groups, but it does not actually contain spaces; it should be exactly 16 characters.
Solution: Create an App Password for Gmail
Visit your App Passwords page to generate an application-specific password for CCC:
- Visit your App passwords page.
- Click Select app and choose Other (custom name). Type in CCC or Carbon Copy Cloner.
- Click the Generate button.
- Paste the application-specific password into the Email Settings panel of CCC's Preferences window. Note: We recommend that you copy and paste the code. If you choose to transcribe it, take care not to insert spaces. The code is presented in four groups, but it does not actually contain spaces; it should be exactly 16 characters.
- Note: Be sure to use an @gmail.com email address for the user name. G Suite accounts are not supported.
Google's reference: Sign in using App Passwords
"Your Gmail account will not permit CCC to send email notifications"
Google is very insistent that developers of third-party applications attain a Google Developer Account and subscribe to Google's proprietary APIs so they can use a special form of authentication with Gmail accounts (OAuth2). Developers that choose to use industry-standard authentication mechanisms instead are unjustly deemed as "less secure", and by default, Google will deny authentication requests from these applications. To add insult to injury, when an application attempts to authenticate to Gmail using the industry-standard authentication methods, Google sends you an email that suggests that the requesting application "doesn't meet modern security standards".
CCC absolutely uses modern security standards — TLS, in particular, to secure all traffic to the SMTP server. TLS has and continues to be the modern security standard for securing email communications. Rather than spend several days implementing support for Google's proprietary authentication mechanism, I have chosen to spend my precious development time improving other functionality within CCC; functionality that's core to protecting your data.
If you get a message that your Gmail account won't permit CCC to send email, we have two suggestions:
- Enable two-step verification on your Google account and then create an application password for CCC [this is our primary recommendation]
— Or —
- Change the settings in your Gmail account that Google disabled
Alternatively, you could just specify a non-Google email account in the Email Settings section of CCC's Preferences window.
Update your SMTP credentials after migrating to new Mac
When you provide your SMTP credentials to CCC, CCC stores them securely in a macOS Keychain file. That keychain file is secured in several ways; it is readable only by the macOS system administrator account, it can only be unlocked by CCC, and it can only be unlocked on the Mac upon which it was originally created. As a result, if you purchase a new Mac and migrate your data to the new Mac, CCC's keychain will not work on the new system and CCC will be unable to send email notifications. After migrating to a new system, open CCC's Email Settings, click the Edit... button, then re-enter your SMTP account credentials.